


Buy 5 or more cards: get 10% off
Buy 10 or more cards: get 20% off
Buy 20 or more cards: get 30% off
No code needed, discount applied automatically at checkout ✨

When it comes to thoughtful gifts, nothing is better than homemade. So this Valentine’s Day, I’m sharing a recipe to make your own chocolate bars, but with a tropical Caribbean twist! The history of chocolate itself is closely linked to the Caribbean region (you can read more about this history on this post), but to make these homemade chocolate bars even more tropical (and delicious) I’ve added some fruity toppings including dried mango, coconut chips and banana chips.
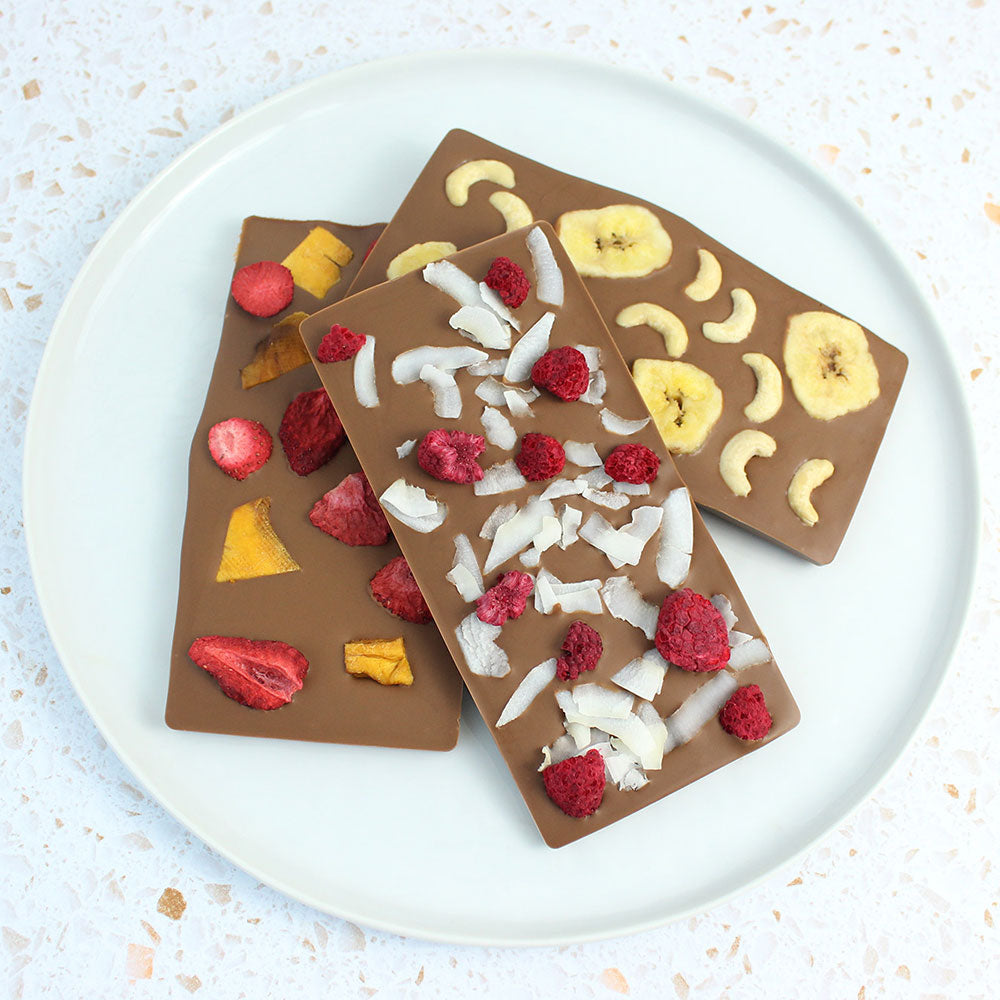
The Caribbean islands have the perfect tropical climate for growing an abundance of fruits, vegetables and spices. This, plus the fertile soil means that the islands are full of trees and plants that grow coconuts, bananas, mangoes and so much more. We can often find these tropical fruits in our local supermarkets or fruit and vegetable market stalls in the UK, though nothing can beat the fruit picked straight from the tree in the Caribbean. For this recipe, I used dried tropical fruits such as dried mango, coconut chips and banana chips for ease and to increase the shelf life of the chocolate bars. I paired these tropical flavours with freeze dried strawberries, freeze dried raspberries and cashew nuts, although you can pair them with any additional toppings that you like.


This recipe also includes free chocolate bar wrapper printables, so you can personalise and beautifully wrap your chocolate bars for your Valentines. There are three wrappers to choose from, depending on which fruity toppings you decide to add to your homemade chocolate bars!
HOW TO MAKE CHOCOLATE BARS
This recipe is super simple and easy to follow, so anyone can make their Valentine this tasty treat! Start by choosing your favourite type chocolate. If you’re looking for something sweet, go for milk chocolate or white chocolate, or if your prefer a more bitter chocolate taste, you could go for a dark chocolate. You could also get a mix of all three to make three different chocolate bars!
Once you have your chosen chocolate type, just melt it in a bowl over a saucepan of hot water (bain-marie) until it is silky smooth. Then, pour the melted chocolate into silicone chocolate bar moulds before topping them with your delicious fruity toppings. Lastly, refrigerate your chocolate bars until they have completely set and then easily remove them from your silicone moulds ready for wrapping (and later eating!).
FREE PRINTABLE CHOCOLATE BAR WRAPPERS
To make these tropical homemade chocolate bars the perfect gift, I’ve create three different chocolate bar wrappers that you can print at home!
*These printable chocolate wrappers are free for personal use. They must not be reproduced or used commercially.
Each wrapper was inspired by a tropical fruit from the Caribbean, and they are all available as greeting cards so that you can pair your homemade chocolate with a tropical card.
HOW TO WRAP YOUR HOMEMADE TROPICAL CHOCOLATE BARS
Once you’ve made your chocolate bars, you can wrap them using clear compostable cellophane or aluminium foil to protect them. If you are using the free printable above, simply print out your chosen design, cut around the wrapper and wrap your chocolate with the wrapper, securing it together with a glue stick or double-sided tape. You could also create your own paper chocolate bar wrapper by using plain paper or card and decorating with your own designs!

TROPICAL CHOCOLATE BARS RECIPE
Watch how to make tropical chocolate bars, and follow along using the video!
INGREDIENTS
300g of your chosen chocolate
Raw coconut chips
Banana chips
Dried mango pieces
Freeze dried strawberries
Cashew nuts
Freeze dried raspberries
Silicone chocolate moulds
STEPS
Step 1 - Place a heat proof bowl over a saucepan of gently simmering water to create a bain-marie. Place your chosen chocolate in the bowl to melt, stirring occasionally. Once your chocolate has melted, remove the saucepan from the heat but keep the bowl over the pot until you’re ready to pour your chocolate in the moulds to prevent the chocolate from hardening.
Step 2 - Remove the bowl from the saucepan, and wipe the bottom of the bowl to remove any condensation (you don’t want any water dripping into your moulds). Pour the chocolate into your moulds and smooth with a spatula, or by gently shaking the moulds until the chocolate is level. You could also transfer the melted chocolate into a jug to pour more easily.
Step 3 - Top each of your chocolate bars with your chosen toppings. I paired coconut chips with freeze dried raspberries, dried mango with freeze dried strawberries and banana chips with cashew nuts. Let the bars sit at room temperature for a few minutes to cool slightly, and then carefully transfer the moulds to the refrigerator to set. They should harden in 30-60 minutes.
Step 4 - Remove your chocolate bars from the moulds to serve on a plate, or wrap using the instructions detailed above.
I hope you love making your own tropical chocolate bars - whether they are for gifts or as chocolatey treats for yourself! If you do make these chocolate bars, please share photos of your creations with me on Instagram (@tiharasmith). I can’t wait to see them!
*Some of the links used in this post are affiliate links, these pay me a small commission for my referral at no extra cost to you. As an Amazon Associate I earn this small commission from qualifying purchases.